Adventures with AWS X-Ray and CDK - Part 3
Instrumenting a whole application

In this post I continue my adventures with X-Ray and try my hand at observing a whole application. In the previous posts in the series, I looked at using X-Ray in a small context. Here we will see what happens when an end-to-end process is traced and logged.
You can download the accompanying code and try it yourself from the GitHub repo.
The example application
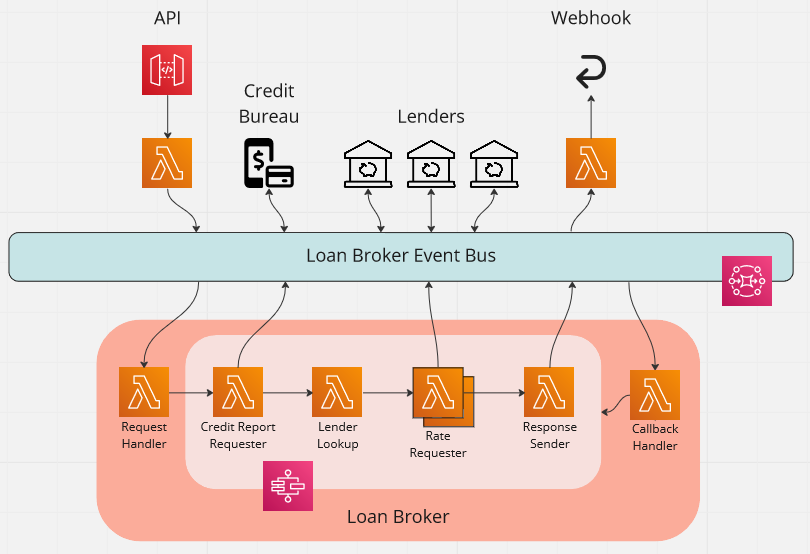
The case study we looked at in the series on implementing Enterprise Integration patterns is an application that acts as a loan broker. The application in question receives a request containing the details of the loan required via an API, and then returns the best rate to a webhook.
The following diagram shows how we use a central EventBridge event bus to implement this.
View the service map
In the last post, I walked through how I added X-Ray to the whole application. Now when I run some requests through the API, we see the following service map.
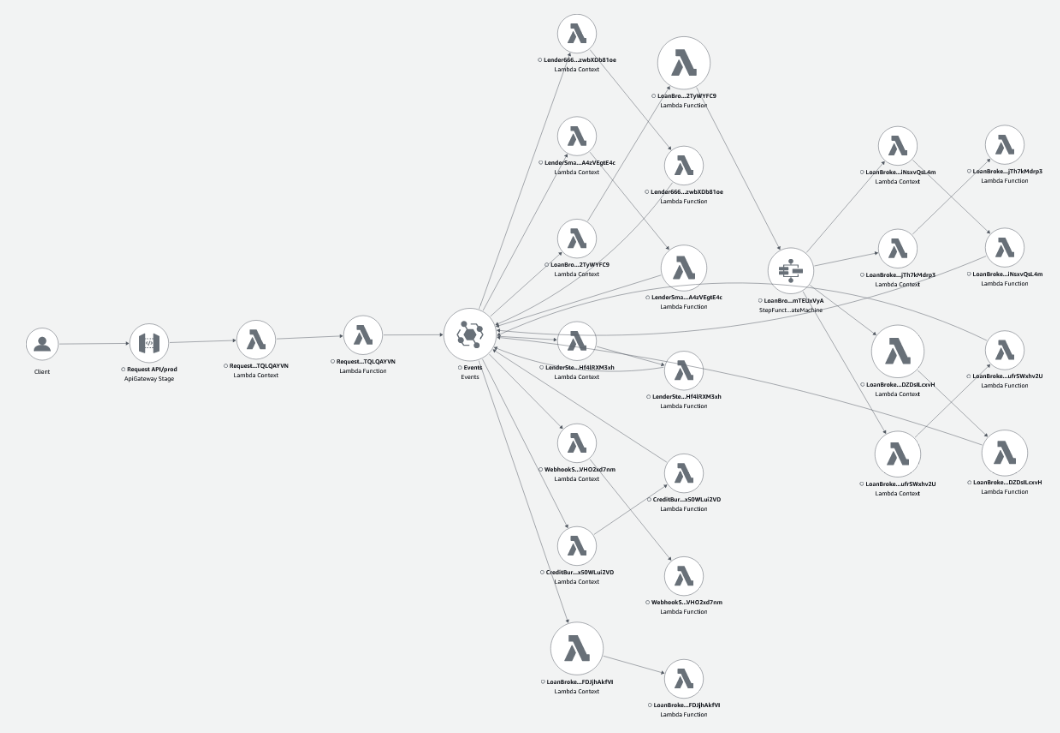
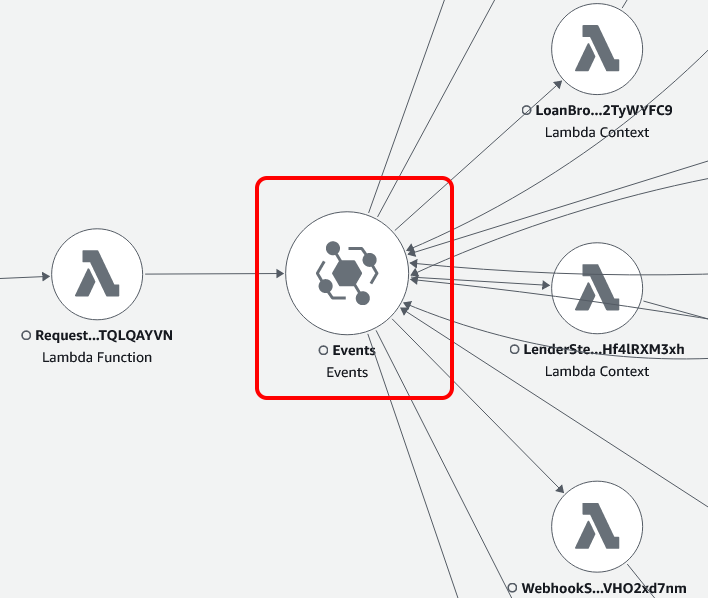
What is quite clear from this picture, is that events are at the heart of this application.
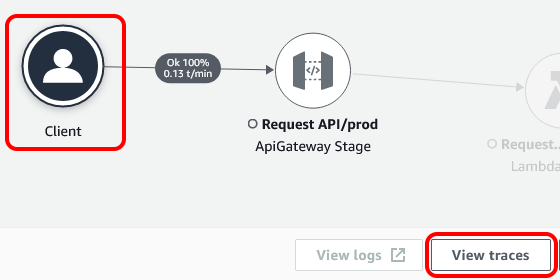
Now, by clicking on the client, we can trace a request all the way through the application and out to the webhook.
However, when I tried this, I found something that was hindering the observability. Ironically, it was observability that I added in the post on Domain Observability.
Removing observability from tracing
In that post, I added business-level observability by hooking a Lambda function up to the domain events being raised.
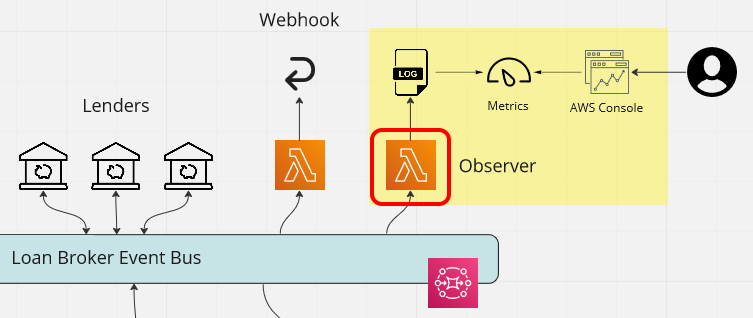
However, as I had enabled tracing for this Lambda function, the trace included numerous entries for the observers which clouded the picture of the process.
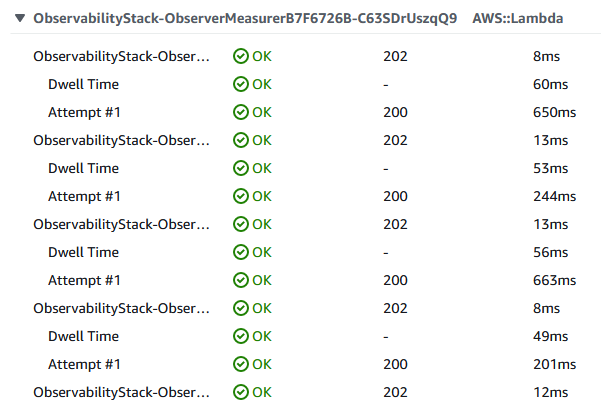
When viewing the log, this was further apparent.

The solution is to specify Tracing.DISABLED for the observability Lambda functions. However, as I still wanted the traces when testing the Lambda functions, I added a isTestMode property the observability CDK stack as follows.
const loggerFunction = new NodejsFunction(
  this,
  'Logger',
  getNodejsFunctionProps({
    // We don't want the observing in the trace for production
    tracing: props.isTestMode ? Tracing.ACTIVE : Tracing.DISABLED,
    // <snip>
  })
);
Now production traces are clean, but we can also take advantage of X-Ray when testing the functionality.
Adding custom subsegments
The article Generating custom subsegments with the X-Ray SDK for Node.js describes subsegments as follows.
Subsegments extend a trace's segment with details about work done in order to serve a request. Each time you make a call with an instrumented client, the X-Ray SDK records the information generated in a subsegment. You can create additional subsegments to group other subsegments, to measure the performance of a section of code, or to record annotations and metadata.
In our application, we have Lambda functions that simulate response from lender systems. At the moment, this is just an algorithm, but in practise would be a call that would take time and be prone to error. This would be an ideal call to surround with a custom subsegment.
With this in mind, I added the following code to allow the lender configuration to control the delay in responding and whether an error occurred.
const simulateExternalCallAsync = async (
  lenderConfig: LenderConfig
): Promise<void> => {
  const randomPercentage = randomInt(100);
  const errorPercentage = lenderConfig.errorPercentage ?? 0;
  const throwError = randomPercentage <= errorPercentage;

  const delayMillis = lenderConfig.minDelayMillis ?? 1000 + randomInt(1000);
  await new Promise((resolve) => setTimeout(resolve, delayMillis));

  if (throwError) {
    const errorMessage = `Simulated error (${randomPercentage} <= ${errorPercentage})`;
    throw new Error(errorMessage);
  }
};
With this in place, I added the code below around the call to simulateExternalCallAsync to add and close the subsegment.
import * as AWSXRay from 'aws-xray-sdk';

// <snip>

const segment = AWSXRay.getSegment();
const subsegment = segment?.addNewSubsegment('External Call');

try {
  // Simple values that are indexed for filter expressions
  subsegment?.addAnnotation('callType', 'Lender');
  subsegment?.addAnnotation('lenderId', lenderConfig.lenderId);
  // Related data for debugging purposes
  subsegment?.addMetadata('lenderDetails', {
    lenderId: lenderConfig.lenderId,
    lenderName: lenderConfig.lenderName,
    lenderUrl: `https://${lenderConfig.lenderId}.com`,
  });

  await simulateExternalCallAsync(lenderConfig);

} catch (error) {
  if (error instanceof Error) {
    // Add error to the subsegment
    subsegment?.addError(error);
  }
  throw error;
} finally {
  // Ensure the subsegment is closed
  subsegment?.close();
}
I redeployed the lenders, with the configuration set to introduce delays but not throw any errors. After running a request, I could see the following in the trace.
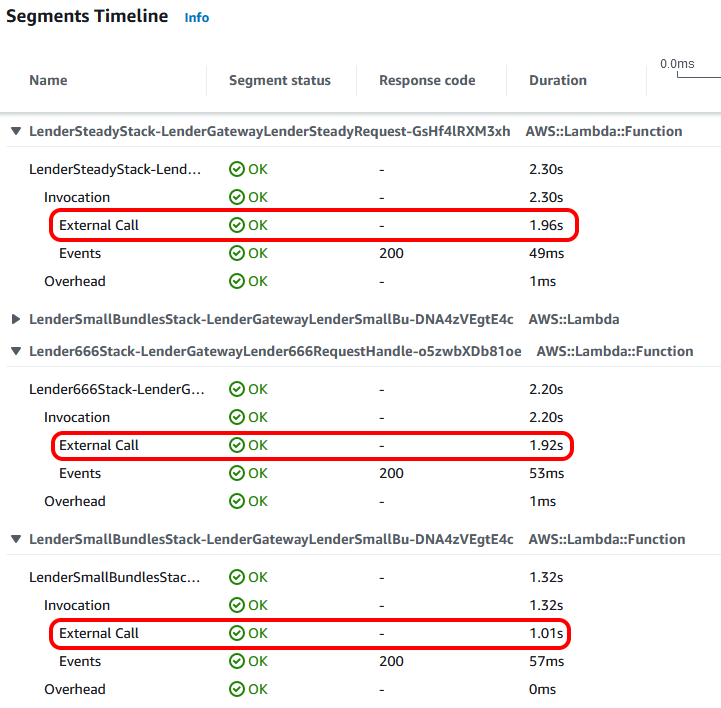
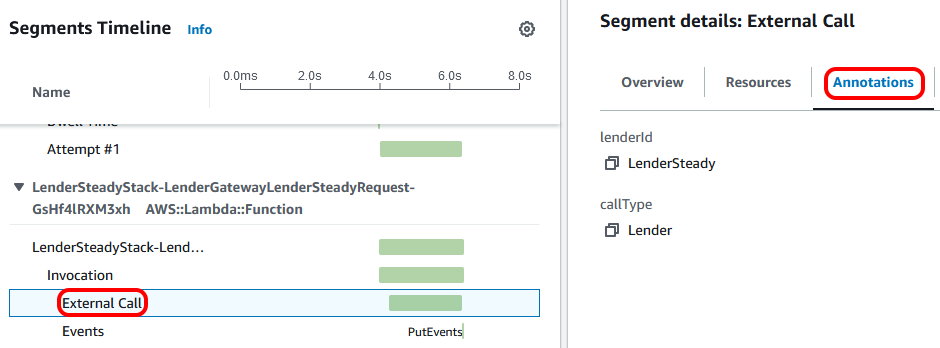
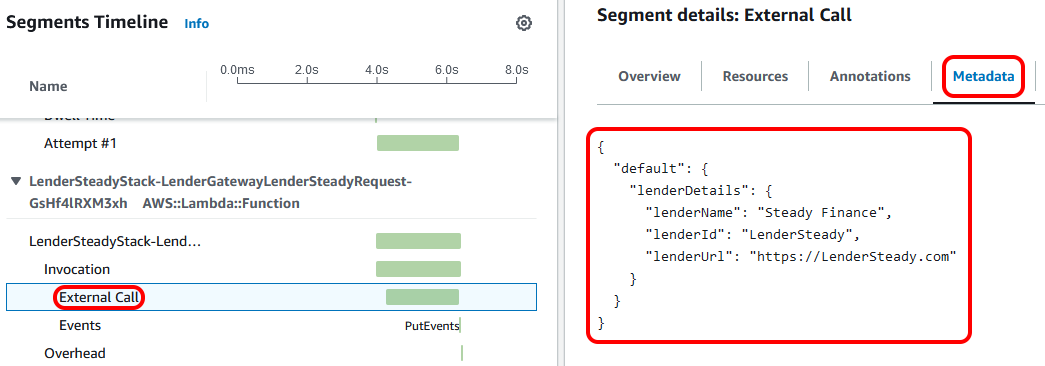
So we can now see the time taken for our 'external call'. What we can also see is the annotation and metadata that we added to the subsegment. Annotations are key-value pairs with simple data (strings, numbers, or booleans) that are indexed for use with filter expressions, whilst metadata can be any related data you'd like to store that's not indexed.
Clicking on the 'Annotations' tab of the segment details, we can see what type of call it was and which lender was called.
For more data, clicking on 'Metadata' shows the lender name and the URL being 'called'.
Forcing some errors
After having a look at what a happy system looks like, I decided to introduce some errors. I updated the configuration for one of the lenders so that it would always throw an error and redeployed.
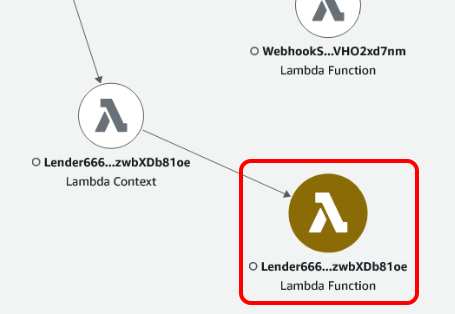
After running a request through the system, the service map clearly showed that the Lambda function for the lender has errors.
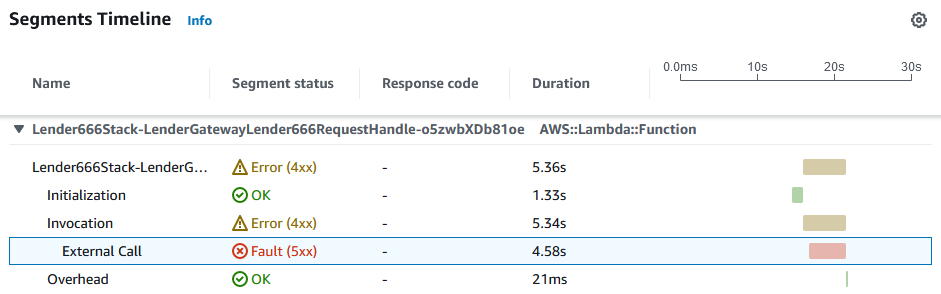
Looking at the trace, I could see that the asynchronous request from the step function had timed out, as the timeout was set to 12 seconds.

The trace also contained the custom subsegment, which clearly shows that there was an error making the external call.
As before, the 'Annotations' and 'Metadata' tabs showed the call details. However, as we added the error to the subsegment, the 'Exceptions' tab also shows us the error details, including the stack trace.
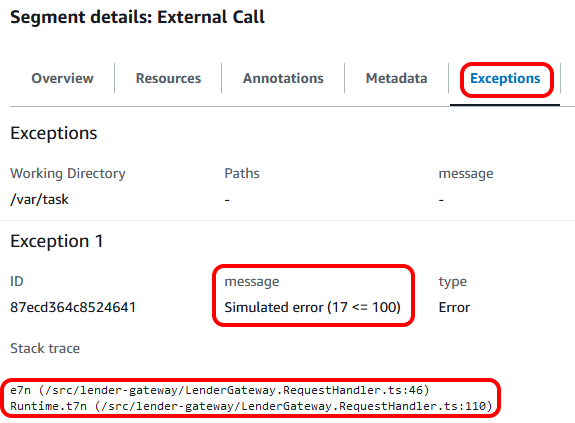
This shows the power of using subsegments to instrument key parts of the application.
Running a workload
The final part of my adventure with X-Ray involved configuring the Lambda functions for the lenders to randomly error and then to put multiple requests through the application.
Looking at the resulting service map, I could see some errors I was expecting and some I didn't.
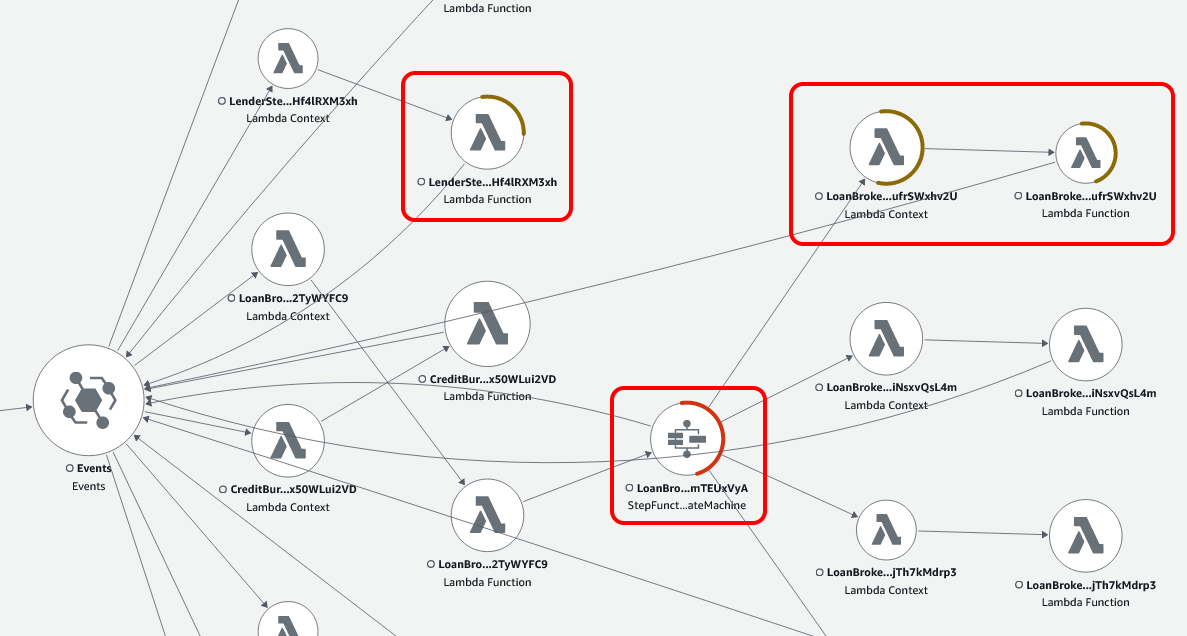
In particular, the step function was showing that it had errored. So I selected it and filtered the traces to see what was going on. On inspection, the Lambda function that sends the response to the webhook was erroring. Clicking on the 'Exceptions' tab clearly indicated to me that the issue was that there was no response to send in this case, but the code didn't cater for it.

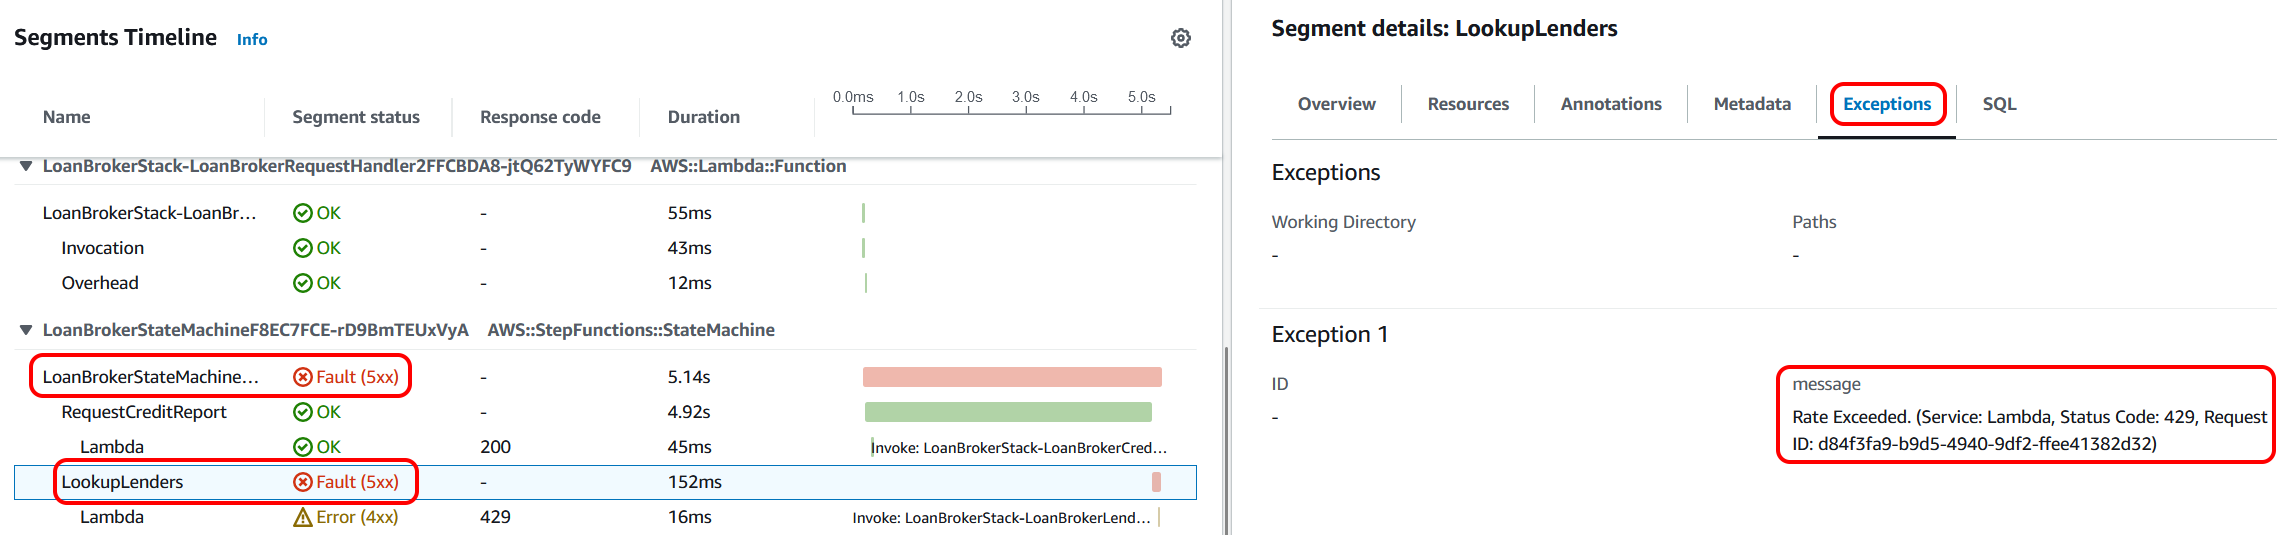
Looking at another error, I saw that the Lambda function that looks up the lenders from the parameter store is throwing an error. Again, the 'Exceptions' tab shows the underlying reason. In this case, there is a rate limit on accessing the parameters in the parameter store. This indicates to me that perhaps we need the application to implement some sort of cache in front of the raw access.
Summary
In this post, I documented my experience using X-Ray with an application. I found the ability to view individual traces through the application, along with the associated logs, very valuable indeed. The ability to see errors and then drill down to the causes was also very valuable and allowed me to see some behaviour that otherwise would have been tricky to spot. Overall, I was very impressed as to what X-Ray has to offer.
Of course, there are also numerous excellent third-party offerings, such as the following:
So, although you get X-Ray out of the box with AWS, please consider these as well.
Links
- Accompanying GitHub repo
- Integrating AWS X-Ray with other AWS services
- How to do Distributed tracing in AWS? | AWS X-ray and Cloudwatch Service Lens
- aws-cdk-lib.aws_xray module
- Tracing AWS SDK calls with the X-Ray SDK for Node.js
- How to do Distributed tracing in AWS? | AWS X-ray and Cloudwatch Service Lens
- Using AWS Lambda with AWS X-Ray
- X-Ray Tracing Modes
- Setting up AWS X-Ray with API Gateway REST APIs